Extract the files to a temporary folder. We need to make some changes.
Rename run-linux.sh to run.sh This is the shell file the docker container will expect, if you do not rename the file, the server will fail to start.
Edit run.sh to include the JVM custom flags. See the README_SERVER_INSALLATION.txt for more information about this. For example, assuming a 20GB allocation you could use:
Edit the server.properties files per the README_SERVER_INSALLATION.txt file. As of this writing, ensure your server.properties has the following lines somewhere in it:
Re-zip your files. Name the zip file something like greedy.zip. The file structure in this zip should mirror the one you downloaded.
Copy this zip file wherever you intend your server files to be. For example /var/docker/greedycraft
Edit your docker-compose.yml file and add your configurations. For example, if using 20GB of memory and a data directory of /var/docker/greedycraft and a customized server zip file at /var/docker/greedycraft/greedy.zip a docker-compose.yml file would look something like (Customize memory and such as needed!):
If all is well, you should be able to start your server by reloading your compose file by running docker-compose up -d from the same directory as your docker-compose.yml file.
Monitor your server with docker logs greedycraft assuming you named the container greedycraft like in the example above. If you see repeating logs and docker container ls -a shows your container either restarting or with a short uptime, you may have an issue. Stop the container and review the logs to troubleshoot. If you see Stopping aura thread for dim xxx however, then you should be good to go! (Assuming no firewall issues and port-forwarding was setup correctly if running across networks, but those are outside the scope of this quick-guide.)
Just a quick post. I ran into an issue updating the MIM Portal. Looking at logs, I found a line reading that a step had failed. The step that failed was just a quick command line run of net start fimservice. Odd step to fail on right?
After running the updater a few times I figured out the issue. The service just was not starting within the 5 second or so time limit of the net start command. Net start returned a non-zero return code and the fim portal service updater treated that as a failure.
The fix is pretty easy though. That net start command spawns in a new cmd prompt window. When you see it, just highlight a character inside the cmd prompt window and that will freeze the command. Check to ensure the fimservice service is started, then press the “enter” key while in cmd prompt to allow it to continue. Net start will see the service is running and return zero to the updater and the updater will happily finish up. Just keep in mind, you have to watch out for that cmd prompt, you only have about a 5 second window to catch and pause it!
I setup Windows Event Forwarding on several servers to log to a Sever Core Event Collector server. I got the GPO setup and all. Since the collector is Core and has no option to open Event Viewer, I opened mmc.exe locally, and attached Event Viewer to remotely manage the Core server subscriptions. Once I was done, I tested it all and… nothing. The event source machines were throwing:
The forwarder is having a problem communicating with subscription manager at address http://collectingserver:5985/wsman/SubscriptionManager/WEC. Error code is 2150859027 and Error Message is The WinRM client sent a request to an HTTP server and got a response saying the requested HTTP URL was not available. This is usually returned by a HTTP server that does not support the WS-Management protocol.
Turns out, the Subscriptions section of Event Viewer never manages the remote computer even if you selected a remote computer when attaching the snap-in.
What finally clued me in, is I checked the collector build with PowerShell against the remote core server, and nothing popped up. The whole time I thought I was managing the core server, I had instead been setting up the collector on my own machine. So yeah, either use a local instance of the Event Viewer snap-in or wecutil.
When you create an application in PowerShell for SCCM, you usually create detection methods with New-CMDetectionClause* cmdlets like New-CMDetectionClauseFile. So I was expecting there to be a matching New-CMDetectionClauseScript or something like that. But that does not exist. Googling this hardly helped as I kept getting results on how to use PowerShell detection methods, not how to create them from within PowerShell.
Turns out, the script detection method is baked into the Add-CM*Deployment methods. Such as:
It’s in the documentation… I just never considered it could be part of the DeploymentType function and not it’s own DetectionClause function like the other types. It makes sense, don’t get me wrong… It lines up with the form in the admin console when manually creating the script-based detection method. I just did not think of it…
We ran into an issue with Microsoft Remote Assistance (MSRA) after disabling RC4 encryption support. I was having a hell of a time troubleshooting the issue and eventually resorted to WireShark for troubleshooting.
WireShark for the MSRA traffic showed that the Encryption type used for MSRA is AES as it should be. No problem there. Then I looked at the kerberos traffic specifically and seen alternating KRB5KCD_ERR_S_PRINCIPAL_UNKNOWN and KDC_ERR-ETYPE-NOSUPP. So the issue was not MSRA but kerberos.
Diving further I found that the TGS-REQ packet in WireShark showed the principal target was not the machine as I expected, but instead, the end-user. So, fun fact there, when you MSRA to a machine, your kerberos ticket is generated for the end-user, not for the machine account. We checked the “This account supports AES” check boxes in AD for the target user, and still the issue occurred.
I checked the logs on the domain controller and came across one in the Kerberos-Key-Distribution-Center category. It was a KDCEVENT_NO_KEY_INTERSECTION_TGS which stated “While processing a TGS request for the target server, the account did not have a suitable key for generating a kerberos ticket (the missing key has an ID of #). The requested etypes were # 23 #. The accounts available etypes were 23. Changing or resetting the password of will generate a proper key.” This pretty much explicitly stated the fix.
While we had matching supported encryption methods, the target user had to change their password for the AES support to kick in! So, if you disable RC4 support, ensure your user accounts have the AES check boxes set, and then make sure they change their passwords shortly after, or at least before you need to use MSRA to assist them.
As I was writing my previous post on optimizing Powershell, I thought of other tips I have had to use to speed up scripts in relation to getting data into PowerShell. Like before, I will start with a summary of recommendations and move onto details.
Summary
Silence your scripts. Any text printed to the console comes with severe time overhead. If you need progress updates, make sure you use Write-Progress over Write-Host.
If you are looking up data in an array at random, then turn your array into a hash-table instead.
When querying a server or system for data, try pulling all the data you need all at once, instead of one at a time. This can speed up your scripts, even if you pull more data that you actually need. This recommendation does heavily depend on the system you are querying and how much extraneous data you get back.
Console Output
A quick side note here. Outputting text to the console is very slow. You can speed up some commands, by silencing the output of the command. You have a few different ways of doing this. Lets look at them.
Name
Method
Time (MS) per 5000 iterations
Piping to Out-Null
$I | Out-Null
107.8185
Saving out to $null
$null = $i
9.9016
So if you need to silence something, saving the output to a variable or $null is far faster than piping to Out-Null. Now that we know the faster method of silencing a command, lets see just how slow printing to the console is.
Name
Method
Time (MS) per 5000 iterations
Print Command
Write-Host $I
4434.8804
Silenced
$null = $I
9.9016
That is around 500 times faster. So if you need speed, consider removing unneeded Write-Host commands, or silencing functions by saving their output to $null. Some good news though, Write-Progress is fairly safe to use.
Name
Method
Time (MS) per 5000 iterations
Write Progress
Write-Progress
642.605
So use Write-Progress over Write-Host if you need progress updates. The script used to pull these metrics:
PowerShell often returns data in Arrays. These arrays are not very fast to query for a single item however. This does not matter for small arrays, or if you will iterate through each item in random order, however if you need to pull a single item out of the array based on one of it’s properties, it can be slow unless you do something to index the data.
The most common method I use, is I turn the array into a hash-table. This only works if the property you are looking each object up with is unique to the array.
I will not focus on the speed metrics here, I already covered hash-table metrics in my last post. I want to show you -how- to convert an array into a hash-table.
First, you need to choose a property that you will query the data on. This is more often than not the object name. If you are querying users from AD, this could be the sAMAccountName or something similar. The only restriction, is that for every object in the array, this property must be unique!
Another tool you can use to speed up searches, is to sort your arrays and use BinarySearch. This does not really work on generic arrays, so if you go this route, make sure you use strongly typed arrays. This also works best on arrays of core data types (Int, string, float, etc), instead of complex objects. If you need to search an array of complex objects based on one of their properties, consider hash-tables instead. Otherwise, you would need to create your own IComparable class…
Lets see how to create, sort, and search these arrays. To create the array, use the .Net method of creating them. In these examples, I will use a string array.
$ItemArray = [string[]]::new($ItemCount)
Next fill in your array with your data. Then, call the sort method on your array. This sort method would be where you enter your custom IComparable object. IComparable objects already exist by default for the core data types, so it is not needed for a string array.
[Array]::Sort($ItemArray)
Finally, call the BinarySearch() function when search for an item in the array, or for the existence of an item in the array. Instead of $ItemArray.Contains() use:
If you are querying alot of data, this is likely a bottleneck in your script, there are some ways you can speed this up however. In general, pulling all your data at once is faster than pulling individual objects one at a time. This applies to many commands but I can attest to Get-ADUser and Get-Item/Get-ChildItem. To the metrics!
Name
Method
Time (MS) per 500 iterations on 100 files
Get files 1 at a time
Get-Item -Path <FilePath>
11227.0608
Get all files
Get-ChildItem -Path <FolderPath>
1148.6165
Get all file names
Get-ChildItem -Path <FolderPath> -Name
664.0743
Get all files by wildcard
Get-Item -Path “<FolderPath>\*”
4060.0878
We can see that pulling all files is faster than pulling them one at a time. Also, if you only need the file names, then adding -Name to Get-ChildItem is faster than having PowerShell grab all file info.
This does not tell the full story. What about filtering it? When we pull one at a time, we have the one file that we need, but if we pull all of them, then we need to search our array and that adds time. But how much? Not a lot if you create a hash-table first!
This is so much faster, that even if you pull twice as many files as you need, it is still faster than pulling the files one at a time! In this next example, I doubled the files in the directory, but still only query for 100.
Name
Method
Time (MS) per 500 iterations on 100 out of 200 files
So even if we pull twice as many files into the hashtable than we need to query, it is still twice as fast as pulling the files one at a time! Note that when creating the hashtable, I am using the .Add() function. This is far faster than the $HashTable+=@{Key=Value} per my previous post. For the script I used to pull these metrics, see:
Sometimes, PowerShell is slow, especially when you are dealing with a large amount of data, but there are ways of speeding things up depending on what you are doing. This post will focus on how to speed up loops, arrays and hash-tables. All metrics were gathered in Windows 10 1909 PSVersion 5.1. Lets start with the summary.
Summary
Pre-initialize your arrays if possible. Instead of adding things to your array one at a time, if you know how long your array needs to be, create it at that length and then fill it.
If you do not know what length the array will be, create a list instead. Adding objects to lists is far faster than adding to an array.
If you need to do random lookups on a set of data, consider sorting your Array/List and then call BinarySearch()
Avoid searching by piping an array to Where-Object, either turn it into a hashtable, or sort the array and use BinarySearch()
When adding items to a hash-table, use the Add() function
When looping through objects, consider using a normal foreach(){}
Arrays and Lists
Now for the actual metrics. You can find the scripts used under each section. For this section, we’ll look at arrays/lists. First, creating and filling.
Most methods of creating and filling arrays are fairly similar. The only noticeable slowdown is if you use PowerShell’s native array, and do not pre-initialize it. This is because on the back-end, whenever you add to the array, the computer effectively re-creates the entire array with each add.
Now on to read performance. In this test, I am just using a simple .Contains() check. While the performance does vary depending on the type of array, we are sub 1-second for 10000 iterations. This is not noticeable to humans. The only noticeable difference is if you pipe your array to Where-Object for searching. That took 11 minutes! If you really need speed though, sorting your array and using BinarySearch is the way to go.
Name
Method
Time (MS) per 10000 iterations
Native Array Contains
$PSArray.Contains($i)
177.2726
.Net Array Contains
$PSArray.Contains($i)
38.632
.Net List Contains
$PSArray.Contains($i)
87.9633
.Net List BinarySearch
$PSArray.BinarySearch($i)
23.1007
Native Array with Pipe Filtering
$PSArray | Where-Object {$_ -eq $i}
680831.936
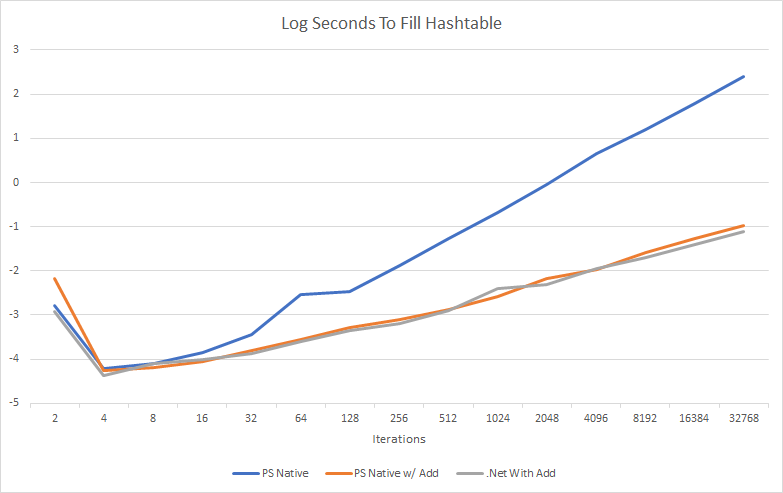
Lets look take a look at hash-tables. Hash-tables are useful as they allow you to assign a key to an object, and then query that quickly at a later time. When adding to hash-tables though, the computer has to make sure the key being added is unique to the hash-table. This has a noticeably negative effect when using the Native PowerShell hash-table. At 22 seconds for 10000 items added to the hashtable, this is still do-able for most scripts. That said, if you add more items to it, it just keeps getting slower. A quick and easy change is to use the Add() function instead of the $HashTable += @{} pattern. If you do that, then there is no real performance difference between the native PowerShell hashtable and a .Net Dictionary.
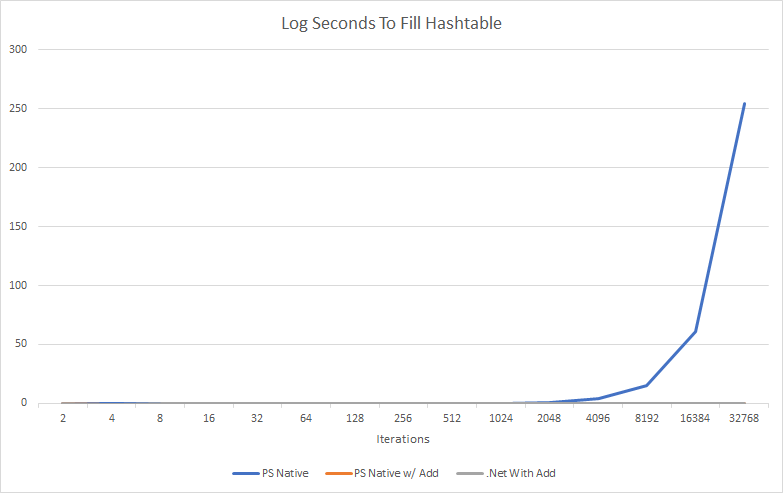
To exemplify how slow hastables can get the more items you add, I charted it out.
Well, that is not super useful is it. All it shows is using the $HashTable += @{} is so slow, the other methods don’t even register. Lets look at that in log10 scale.
Definently make sure you use the .Add() function for any large hash-table!
For reading hash-tables, I just checked how quickly keys could be searched. Both .Net and the native method of creating hash-tables were suitably fast.
Name
Method
Time (MS) per 10000 iterations
Native Hashtable Contains
$PSArray.ContainsKey($i)
31.041
.Net Hashtable Contains
$PSArray.ContainsKey($I)
21.0664
Scripts used for metrics gathering and the Excel sheet used to create charts.
Finally lets look at loop performance. If you need to perform some action on every item in a collection, you have several options. It would take large arrays to notice much of a difference in which method you use, but in my tests, using a foreach(){} loop outperformed all other methods and piping a collection to foreach-object {} had the worse performance.
We had some users complaining about old Adobe Reader updates not installing from WSUS. The issue was inconvenient, but as soon as SCCM pushed more recent Adobe updates to the user, the issue went away. We decided to expire these old updates and remove them, however there was an issue. Whenever we attempted to publish the update as expired from SCUP, we got Verification of file signature failed for file: <Some cab file path here>. I had issues like this before and tried to remove it using PowerShell/.Net instead. I have had to do this before when we lost our SCUP database file. My go-to code for that is:
#This code largely from https://myitforum.com/how-to-expire-a-custom-update-in-wsus-using-powershell/
#Run this from WSUS for central site server
#Load .NET assembly
[reflection.assembly]::LoadWithPartialName("Microsoft.UpdateServices.Administration")
#Connect to WSUS server
$wsusrv = [Microsoft.UpdateServices.Administration.AdminProxy]::GetUpdateServer()
#Get all the non-microsoft updates
$otherupdates = $wsusrv.GetUpdates() | select * | ? {$_.UpdateSource -ne "MicrosoftUpdate"}
#$wsusrv.GetUpdate($_.id)}} #Get more info on a specific update
$otherupdates | where-object { <#$_.id -eq "" -or #> $_.title -like "*adobe*"} | foreach-object {$wsusrv.ExpirePackage($_.id)}
This still did not work however, the script returned the exact same error as when the update is expired using SCUP. It turns out, the SCUP certificate that signed these cab files had expired about a month prior to this issue. In a last ditch effort, we were able to expire these updates by rolling the server time back to a time when the certificate was still valid. We were then able to re-publish the updates as expired from SCUP and the issue was resolved.
I have played around with the idea of making a single-file HTML report easily exportable from PowerShell before. A couple of these used to be hosted in the old version of this blog. We recently had to rebuild a report at my office and I decided it would be a good time to make another go at an HTML reporting framework. This time, something more generalized and customizable.
The end result this time is a framework which will take an HTML template one or more CSS templates, images, custom outputs from scripts, and combine these resources together into a single-file report that could be sent out without any dependency files. The idea behind the separate template elements is to keep the report structure, design, and the scripts relatively separate preventing a massive monolithic monstrosity. If you need to add a new item to the report, say cpu utilization or some other metric, you could just add a new child script. If you need to adjust the colors used in the report, but not the contents itself, you can just edit the CSS file master template or if you need to adjust the structure of the report, you could do so, without ever having to touch the PowerShell scripts responsible for gathering the information being reported.
The main script looks at custom tags in the template itself to fill in the final report with the necessary information from child scripts. If this sounds like something that could be useful, checkout the project on Github.
We ran into additional issues with our Adobe Update Server. The issue was that clients were not using the internal Adobe Update server despite having the override files pointing them to the internal Adobe Update Server. WireShark showed that clients with the override file would connect to the server, download a single file, and then continue any further update attempts utilizing Adobe’s servers. Turns out, in our case, there were some additional URLs being blocked that prevented a complete Adobe Update Server setup. I have no clue which ones, however, if you have this issue, ensure your update server can reach the URLs/domains contained in Adobe’s endpoint documentation.
Going through this process I learned a few troubleshooting/configuration tricks from the client’s side. In no particular order, here are some notes:
Try the Remote Update Manager (RUM) locally on the client. It can usually be found at “C:\Program Files (x86)\Common Files\Adobe\OOBE_Enterprise”. If it fails to download from your update server, it should return an error in the console that may point you in the correct direction.
Ensure you check the client’s “%TEMP%\CreativeCloud\ACC\ACC.log” and “%TEMP%\CreativeCloud\ACC\AdobeDownload\DLM.log” log files.
Turn on directory browsing in IIS (If using IIS to host the update files) and ensure that you can download each type of file from your updates url.
Override files must go “C:\Program Files (x86)\Common Files\Adobe\UpdaterResources” and “C:\ProgramData\Adobe\AAMUpdater\1.0”. One of those directories does not exist by default, create it.
You can enable the Apps tab for clients in the “C:\Program Files (x86)\Common Files\Adobe\OOBE\Configs\ServiceConfig.xml” file.