Create SCCM Script Detection in PowerShell

This is mostly a post about me being dumb.

When you create an application in PowerShell for SCCM, you usually create detection methods with New-CMDetectionClause* cmdlets like New-CMDetectionClauseFile. So I was expecting there to be a matching New-CMDetectionClauseScript or something like that. But that does not exist. Googling this hardly helped as I kept getting results on how to use PowerShell detection methods, not how to create them from within PowerShell.

Turns out, the script detection method is baked into the Add-CM*Deployment methods. Such as:

$DetectionScript = @"
if ($SomeCondition -eq $true) {
	Write-Host "Installed"
}
exit 0
"@

Add-CMScriptDeploymentType -DeploymentTypeName "SomeDT" -InstallCommand "Setup.bat" -ApplicationName "MyApp" -ScriptText $DetectionScript -ScriptLanguage PowerShell -ContentLocation "\\SomeServer\SomeShare\PackageSource"

It’s in the documentation… I just never considered it could be part of the DeploymentType function and not it’s own DetectionClause function like the other types. It makes sense, don’t get me wrong… It lines up with the form in the admin console when manually creating the script-based detection method. I just did not think of it…

Since I am making a post on this, definitely check out the documentation on how SCCM uses the detection script output: https://learn.microsoft.com/en-us/previous-versions/system-center/system-center-2012-R2/gg682159(v=technet.10)#to-use-a-custom-script-to-determine-the-presence-of-a-deployment-type

Old SCUP update hanging around

We had some users complaining about old Adobe Reader updates not installing from WSUS. The issue was inconvenient, but as soon as SCCM pushed more recent Adobe updates to the user, the issue went away. We decided to expire these old updates and remove them, however there was an issue. Whenever we attempted to publish the update as expired from SCUP, we got Verification of file signature failed for file: <Some cab file path here>. I had issues like this before and tried to remove it using PowerShell/.Net instead. I have had to do this before when we lost our SCUP database file. My go-to code for that is:

#This code largely from https://myitforum.com/how-to-expire-a-custom-update-in-wsus-using-powershell/
#Run this from WSUS for central site server
#Load .NET assembly
[reflection.assembly]::LoadWithPartialName("Microsoft.UpdateServices.Administration")
#Connect to WSUS server
$wsusrv = [Microsoft.UpdateServices.Administration.AdminProxy]::GetUpdateServer()
#Get all the non-microsoft updates 
$otherupdates = $wsusrv.GetUpdates() | select * | ? {$_.UpdateSource -ne "MicrosoftUpdate"}
#$wsusrv.GetUpdate($_.id)}} #Get more info on a specific update
$otherupdates | where-object { <#$_.id -eq "" -or #> $_.title -like "*adobe*"} | foreach-object {$wsusrv.ExpirePackage($_.id)}

This still did not work however, the script returned the exact same error as when the update is expired using SCUP. It turns out, the SCUP certificate that signed these cab files had expired about a month prior to this issue. In a last ditch effort, we were able to expire these updates by rolling the server time back to a time when the certificate was still valid. We were then able to re-publish the updates as expired from SCUP and the issue was resolved.

Deploy Applications via SCCM 2016 PowerShell cmdlets

Continuing my PowerShell automation notes for SCCM. Below is a rough example on how to deploy Applications in SCCM 2016 using PowerShell. The real meat of it comes down to 5 cmdlets. As an extra goodie, also included the cmdlet to remove old deployments as well. Note: If you are using these cmdlets on a new machine or account, the account that is to run these cmdlets should open the SCCM console on that machine, and click the “Connect with PowerShell” option first. If the account has not performed these steps, the SCCM drive will not be available when the SCCM cmdlets are imported. You will see errors such as “A drive with the name ‘xyz’ does not exist.”

Command Run Down

The core commands we are interested in are

New-CMApplication # Creates a new application in SCCM
Add-CMScriptDeploymentType # Adds a script based deployment type or optionally
Add-​CM​Msi​Deployment​Type # Which will add an MSI deployment type

An additional note here on these two. These are currently your only deployment options and this directly limits your installation detection options. MSI is locked down to using the MSI product GUID for installation detection. If you need anything more complex than that, you are pretty much stuck with using a script based detection method and the script deployment type. The registry key and file options are not currently available. Luckily you can do nearly any detection method in PowerShell. The script below for example checks a registry key. For more information on creating a script for PowerShell based installation detection methods see the relevant docs.microsoft.com article and also David O’Brien’s blog.

Start-CMContentDistribution # Distributes our content to our Distribution Points
Start-CMApplicationDeployment # Actually deploys our finished application package to end users
Remove-CMDeployment # Removes deployments. Useful if you have an older deployment you are replacing
Move-CMObject # Moves your Application to a different folder within the SCCM console

Example Script


Param
(
    [string]$PackageDirectory="\\Path\To\Package\Source\",#Package source
    [string]$IconPath="C:\SomePath\SomeIcon.ico",#Icon to show in software center
    [string]$SCCMDrive="SCM:\",#Should be your 3 character site code generally
    [string]$SCCMAdmin="john.doe",#Owning admin
    [string]$TargetCollection="All Windows Workstations",#Collection to deploy to
    [string]$LogPath="C:\Logs\somelog.log",#Path to save log
    [string]$TargetDPs = "All Distribution Points"#Distribution point group to deploy to
)
#Start a log
$Log = "Starting Package Script`r`n"
try
{
    #Import SCCM Module
    Import-Module "C:\Program Files (x86)\Microsoft Configuration Manager\AdminConsole\bin\ConfigurationManager.psd1" -ErrorAction Stop
    if (-not (Test-Path -Path $SCCMDrive))
    {
        $Log+="SCCM PowerShell cmdlets provider is not initialized for this account, on this machine. Please open the SCCM console and select 'Connect with PowerShell' at least once before using this script on thise machine.`r`n"
        throw "SCCM PSProvider does not have a drive assigned"
}
catch
{
    #End script if we could not add module
    $Log += "Failed to add required module!`r`n"
    $Log += "----End Package Script----`r`n"
    $Log | Out-File -FilePath $LogPath -Append
    exit 1
}

#TODO: Prepare files as needed here
#Maybe dynamically get file verison, or application name, unzip files if needed, etc
$Version = "1.0.0.0"
$ProductName = "Sample Application"
$ApplicatioName = "$ProductName $Version"
$Publisher = "ACME"
$InstallCommand = "`"SomeInstaller.exe`" /s"
$DetectScript = "if (Test-Path `"HKLM:\SOFTWARE\Microsoft\Windows\CurrentVersion\Uninstall\MyProdct`"){ if ((Get-ItemProperty -Path `"HKLM:\SOFTWARE\Microsoft\Windows\CurrentVersion\Uninstall\MyProduct`" -Name `"DisplayVersion`").DisplayVersion -eq `"$Version`") { Write-Host `"Installed`" } } exit 0"

try
{
    $Log += "Creating `"$ApplicationName`"`r`n"
    #Change to SCCM powershell provider, SCCM cmdlets generally do not work otherwise, however, some cmdlets may fail in the SCCM drive. Keep this in mind, you may need to switch between providers
    CD $SCCMDrive
    #Create a new application. (Won't deploy, won't distribute, won't create deployment type. Just the application info)
    $MyNewApp = New-CMApplication -Name $ApplicationName -Description "Auto-Added by Packager.ps1" -Publisher $Publisher -SoftwareVersion $Version -LocalizedName $ApplicationName `
        -Owner $SCCMAdmin -SupportContact $SCCMAdmin -IconLocationFile $IconPath -ErrorAction Stop

    #Move the application
    $Log += "Moving`"$ApplicationName`"`r`n"
    $MyNewApp | Move-CMObject -FolderPath "$($SCCMDrive)Application\SomePath\ToPlace"

    $Log += "Creating `"$ApplicationName`" - Install`r`n"
    #Add a deployment type to the new application, this won't distribute or deploy it
    Add-CMScriptDeploymentType -ApplicationName $ApplicationName -ContentLocation $PackageDirectory -ContentFallback -EnableBranchCache -InstallCommand $InstallCommand `
        -LogonRequirementType WhetherOrNotUserLoggedOn -SlowNetworkDeploymentMode Download -UserInteractionMode Hidden -InstallationBehaviorType InstallForSystem `
        -DeploymentTypeName "Install" -ScriptLanguage PowerShell -ScriptText $DetectScript -ErrorAction Stop
    #If you are doing an MSI install, look into "Add-​CM​Msi​Deployment​Type" 
    #https://docs.microsoft.com/en-us/powershell/sccm/configurationmanager/vlatest/add-cmmsideploymenttype

    $Log += "Distributing `"$ApplicationName`" - Install`r`n"
    #Distribute the content, doesnt deploy
    Start-CMContentDistribution -ApplicationName $ApplicationName -DistributionPointGroupName $TargetDPs

    $Log += "Deploying `"$ApplicationName`" - Install`r`n"
    #Deploy the new application
    Start-CMApplicationDeployment -CollectionName $TargetCollection -Name $ApplicationName -DeadlineDateTime ([DateTime]::Now) -AvailableDateTime ([DateTime]::Now) `
        -DeployAction Install -DeployPurpose Required -OverrideServiceWindow $true -TimeBaseOn LocalTime -UseMeteredNetwork $true

    $Log += "Stopping old deployments`r`n"
    #Additionally, we can stop any old deployments.
    #Grab all apps similiarly named to what we just deployed, but are not what we deployed
    $Apps = @()+(Get-CMApplication -Fast | Where-Object -FilterScript {$_.LocalizedDisplayName -like "$ProductName *" -and $_.LocalizedDisplayName -ne $ApplicationName -and $_.IsDeployed})
    foreach ($App in $Apps)
    {
        Write-Log "Deployment for $($App.LocalizedDisplayName) stopped`r`n"
        #And remove their deployment rule
        #You may need to change application name. My ApplicationName and LocalizedDisplayName usually match
        Remove-CMDeployment -CollectionName $TargetCollection -ApplicationName $App.LocalizedDisplayName -Force 
    }
}
catch
{
    Write-Log "Failed to create package. $($_.ToString())"
}

#Return to filesystem provider
cd "$($env:SystemDrive)\"

$Log += "----End Package Script----`r`n"
$Log | Out-File -FilePath $LogPath -Append
exit 0

For additional information on the cmdlets, please see the 2016 cmdlet reference at docs.microsoft.com.

Deploy Updates via SCCM 2016 PowerShell cmdlets

I have found very few examples on how to use the SCCM PowerShell cmdlets to deploy updates. Maybe someone will find this example useful. The following script will search the update catalog for relevant updates, add them to a Software Update Group, create a Software Update Package, download the updates contained in the Software Update Group into the Software Update Package and distribute them to a distribution point group. Then optionally, you can deploy it to a collection of machines afterwards.

Command run down

The commands specifically relating to SCCM are:

Get-CMSoftwareUpdate # Lists available updates from SCCM catalog
New-CMSoftwareUpdateGroup  # Creates a new Software Update Group
New-CMSoftwareUpdateDeploymentPackage # Creates a Software Update Package
Save-CMSoftwareUpdate # Downloads updates into a Deployment Package
Start-CMContentDistribution # Distributes downloaded content to Distribution Points

The Script


Param($SoftwareUpdateSource="\\YourShare\PathTo\SCCMSupSource", $DistributionGroup="All Distribution Points")#, $CollectionName = "All Systems") #Uncomment this if you also want to deploy to a collection as the last step 

#Used in creating update group name
$Date = [DateTime]::Now.ToString("yyyy-MM-dd");

#Grab all updates in the catalog
$UpdateCatalog = Get-CMSoftwareUpdate -Fast

#Filter out the updates we don't need
#Specifically, this filter will pull Updates created in the last 31 days that are not deployed, expired, or superseded that are not preview updates and SCCM has confirmed at least 25 machines require them
$Updates = Where-Object -FilterScript {$_.DateCreated -gt [DateTime]::Now.AddDays(-31) -and $_.IsDeployed -eq $false -and $_.LocalizedDisplayName.Contains("Preview") -eq $false -and $_.IsExpired -eq $false -and $_.IsSuperseded -eq $false -and $_.NumMissing -gt 25}

#We only need the update IDs. Newer powershell will automatically loop through each update and pull the CI_ID properties into an array with this line
$UpdateIDs = $Updates.CI_ID 

#Now we create the software update group
New-CMSoftwareUpdateGroup -Name "Security Updates $Date" -UpdateId $UpdateIDs

#Create a new folder in the Sup Source directory to contain package files
New-Item -Path "filesystem::$SoftwareUpdateSource\$Date" -ItemType Directory

#Create the deployment package
New-CMSoftwareUpdateDeploymentPackage -Name "Security Updates $Date" -Path "$SoftwareUpdateSource\$Date"

#Download the software update group to the deployment package
Save-CMSoftwareUpdate -SoftwareUpdateGroupName "Security Updates $Date" -DeploymentPackageName "Security Updates $Date" 

#And finally distribute it to your Distribution Points
Start-CMContentDistribution -DeploymentPackageName "Security Updates $Date"-DistributionPointGroupName "$DistributionGroup"

#After this you would deploy, if you want to automate that, look into the following. You will likely want/need to customize this portion.
#See "Get-Help Start-CMSoftwareUpdateDeployment" for more options 
<# Start-CMSoftwareUpdateDeployment -AcceptEula -AllowRestart $true -AllowUseMeteredNetwork $true ` -CollectionName $CollectionName -DeploymentAvailableTime ([DateTime]::Now.AddDays(1)) ` -DeploymentName "Security Updates $Date - $CollectionName" -DeploymentType Required -Description "Automatic updates" ` -DownloadFromMicrosoftUpdate $false ` -EnforcementDeadline ([DateTime]::Now.AddDays(8)) ` -ProtectedType RemoteDistributionPoint -RestartServer $false -RestartWorkstation $true -SoftwareInstallation $true ` -SoftwareUpdateGroupName "Security Updates $Date" -TimeBasedOn LocalTime -UnprotectedType NoInstall -UseBranchCache $true ` -UserNotification DisplaySoftwareCenterOnly #>

See also

Googling for SCCM PowerShell cmdlets usually returns a link to the SCCM 2012 R2 library of cmdlets on technet. I managed to find the latest SCCM 2016 cmdlet references at docs.microsoft.com.

Install-Printer

Code Release

This script is intended to assist in SCCM deployments of optional printers. The intended effect is to allow a user to open Software Center or the SCCM Application Catalog and click an option such as “Map me to XXX Printer”, and have the printer, port, and driver all install automatically.

Parameters

DriverName <Object> The name of the printer driver as defined in the INF file.
DriverInf <Object> Full path to the Driver INF file
DriverPath <Object> Path to the folder containing the driver files. (Default is the INF directory)
PrinterIP <Object> IP of the printer to map
PrinterPort <Object> Printer’s connection port. Default is 9100
PrinterPortName <Object> Name of the printer port. Defaults to “IP_<IP>”
PrinterCaption <Object> Name of the printer
Remove [<SwitchParameter>] Removes the specified printer instead of installing it
DriverOnly [<SwitchParameter>] Only installs the printer driver. Does not attempt to create the port or printer
AllSteps [<SwitchParameter>] Performs Driver install followed by the port and printer mappings. (Default without this and driver only is to only map a printer)
WriteLog [<SwitchParameter>] Writes Debug data to a log file. (Default is true)
RemoveAll [<SwitchParameter>] Removes all mapped printers. (You may need to run this once as the user, and once as an admin for full effect)
AdditionalRemovalExclusions <Object> When used with RemoveAll, prevents the removal of listed printers. By default, Send to One Note, and FAX are excluded.

Usage

PowerShell Script

To add a printer:

&"" -PrinterCaption "My Printer" -DriverName "Xerox 7845 PS v4" -PrinterIP "192.168.1.2"

To add a driver:

&"" -DriverName "Xerox 7845 PS v4" -DriverInf "\\Drivers\Xerox\7845\Driver.inf" -DriverOnly

To remove a printer and also disable logging

&"" Install-Printer.ps1 -PrinterCaption "My Printer" -Remove -WriteLog:$false

To install a driver and then map a printer (Note that, in general, only administrators have the permissions to successfully use the script this way)

&"" -PrinterCaption "My Printer" -DriverName "Xerox 7845 PS v4" -DriverInf "\\Drivers\Xerox\7845\Driver.inf" -PrinterIP "192.168.1.2" -AllSteps

To remove all printers, or a selection of printers

&"" -RemoveAll -AdditionalRemovalExclusions @("My Printer", "Send by E-mail printer")

SCCM Usage

To install a printer from SCCM, do the following.

  1. Create an application package for your driver. This can be an executable install or an INF install. If you are using an INF file, you may use the Install-Printer script to help.

    Example of the Driver Installation Programs Tab

    1. To create an INF file Application deployment. Create a new application deployment. Set the command to
      &"Install-Printer.ps1" -DriverOnly -DriverName '' -DriverINF ''

      Example of the Driver Installation Detect Tab

      Example of the Driver User Experience Tab

      Example of the Driver Installation Detect Script
    2. For the detection method, us the “Driver Detection” script in the “script” section of this page.
  2. Create an application package for your printer.
    1. Create a new Application Deployment. Set the command to “Install-Printer.ps1” -PrinterCaption ‘My Printer’ -DriverName ‘Xerox 7845 PS v4’ -PrinterIP ‘192.168.1.2’

      Example of the Printer Installation Programs Tab
    2. Set the detection method to the “Printer Detection” script in the “script” section of this page.

      Example of the Printer Installation Detect Script
    3. Set this package to install for the user.

      Example of the Printer Installation User Experience Tab
    4. Add a requirement that points to the appropriate driver application package that you created earlier.

      Example of the Printer Installation Dependency Tab

Script

Install-Printer

<#
.SYNOPSIS
    Provides helpfull script to add printers to a machine
 
.DESCRIPTION
    Provides a method to add a printer, driver, and port to a machine
 
.PARAMETER DriverName
    The name of the printer driver as defined in the INF file.
 
.PARAMETER DriverInf
    Full path to the Driver INF file
 
.PARAMETER DriverPath
    Path to the folder containing the driver files. (Default is the INF directory)
 
.PARAMETER PrinterIP
    IP of the printer to map
 
.PARAMETER PrinterPort
    Printer's connection port. Default is 9100
 
.PARAMETER PrinterPortName
    Name of the printer port. Defaults to "IP_". If you need to map the printer to a default local port, use the name of the port instead. Such as "FILE:".
 
.PARAMETER PrinterCaption
    Name of the printer
 
.PARAMETER Remove
    Removes the specified printer instead of installing it
 
.PARAMETER DriverOnly
    Only installs the printer driver. Does not attempt to create the port or printer
 
.PARAMETER AllSteps
    Performs Driver install followed by the port and printer mappings. (Default without this and driver only is to only map a printer)
 
.PARAMETER WriteLog
    Writes Debug data to a log file. (Default is true)
 
.PARAMETER RemoveAll
    Removes all mapped printers. (You may need to run this once as the user, and once as an admin for full effect)
 
.PARAMETER LocalPrinter
    Specified that the printer is local to the machine. This is needed if mapping a non-network device. (Such as the XPS printer)
 
.PARAMTER PrinterOnly
    Only maps a printer, does not add a port, nor install a driver.
 
.PARAMETER AdditionalRemovalExclusions
    When used with RemoveAll, prevents the removal of listed printers. By default, Send to One Note, and FAX are excluded.
 
.OUTPUTS
    Log file located at C:\Temp\.log
 
.EXAMPLE
    Install-Printer.ps1 -PrinterCaption "My Printer" -DriverName "Xerox 7845 PS v4" -PrinterIP "192.168.1.2"
 
.EXAMPLE
    Install-Printer.ps1 -DriverName "Xerox 7845 PS v4" -DriverInf "\\Drivers\Xerox\7845\Driver.inf" -DriverOnly
 
.EXAMPLE
    Install-Printer.ps1 -PrinterCaption "My Printer" -Remove -WriteLog:$false
 
.EXAMPLE
    Install-Printer.ps1 -PrinterCaption "My Printer" -DriverName "Xerox 7845 PS v4" -DriverInf "\\Drivers\Xerox\7845\Driver.inf" -PrinterIP "192.168.1.2" -AllSteps
 
.EXAMPLE
    Install-Printer.ps1 -RemoveAll -AdditionalRemovalExclusions @("My Printer", "Send by E-mail printer")
 
.EXAMPLE
    Install-Printer.ps1 -PrinterCaption 'Microsoft XPS Document Writer' -PrinterPortName 'FILE:' -DriverName 'Microsoft XPS Document Writer v4' -PrinterOnly -LocalPrinter
 
.NOTES
    Version:        1.3
    Author:         Matthew Thompson
    Creation Date:  2015-12-16
    Purpose/Change: PrinterOnly, and LocalPrinter Features, Printer Removal by IP, Bug fix in event no printers exist and script is run to install one.
    This script was heavily influenced by Kris Powell. (http://www.adminarsenal.com/admin-arsenal-blog/how-to-add-printers-with-powershell)
#>
[CmdletBinding()]
Param
(
    [string]$DriverName, 
    [string]$DriverInf,
    [string]$DriverPath={if ($DriverINF -ne $null){(Split-Path $DriverInf)}}, 
    [string]$PrinterIP, 
    [int]$PrinterPort=9100, 
    [string]$PrinterPortName=("IP_"+$PrinterIP), 
    [string]$PrinterCaption, 
    [Switch]$Remove,
    [switch]$DriverOnly,
    [switch]$AllSteps,
    [switch]$WriteLog=$true,
    [switch]$RemoveAll,
    [string[]]$AdditionalRemovalExclusions=@(),
    [switch]$LocalPrinter,
    [switch]$PrinterOnly
)
 
#Setup the exclusions for RemoveAll
$Exclusions = @("Fax", "Send To OneNote 2013", "Send To OneNote 2010", "Microsoft XPS Document Writer", "Microsoft XPS Document Writer v4")
$Exclusions+=$AdditionalRemovalExclusions
 
$Log=""
 
#Log File Info
$ScriptName = Split-Path -Leaf $PSCommandPath
$LogFile = Join-Path -Path "C:\Windows\Temp" -ChildPath ($ScriptName+".log")
#Do a self-referential lookup to get the script version. As long as the .NOTES section of the file header is up to date and the script is trusted, this should work.
(Get-Help $PSCommandPath -Full -ErrorAction SilentlyContinue).alertset.alert.Text -match "^\s*Version\s*:\s*[\w\d\.\,]*" | Out-Null
if ($matches-ne$null-and$matches.Count-ge1)
{
    $Version = $matches[0] -replace "^\s*Version\s*:\s*",""
}
 
#Write log data
$Log+="Version: "+$Version+"`r`n"
 
#Write Parameters to log
$PSBoundParameters.Keys | ForEach-Object -Process {$Log+=("`""+$_+"`" = `""+$PSBoundParameters[$_]+"`"`r`n")}
 
#Creates a printer object for the user.
function Create-Printer
{
    Param 
    (
        $PrinterCaption, 
        $PrinterPortName, 
        $DriverName,
        [Switch]$Local=$false
    )
    try
    {
        $Printers = @()
        $Printers += Get-WmiObject -Class "Win32_Printer"
        [string]$Log="Installed Printers ("+$Printers.Length.ToString()+") `r`n"
        $Printers | ForEach-Object -Process {$Log+=$_.Name+"`r`n"}
        if ($Printers.Length -eq 0 -or ($Printers.Name).Contains($PrinterCaption) -eq $false)
        {
            $Log+="Attempting to create printer`r`n"
            $Instance = Set-WmiInstance -Class "Win32_Printer" -Arguments @{Caption = $PrinterCaption;DriverName = $DriverName;PortName = $PrinterPortName;DeviceID = $PrinterCaption;Network = (-not $Local)} -ErrorAction Stop
            if ($Instance -ne $null)
            {
                $Log+= "Printer Created`r`n"+$Instance.ToString()+"`r`n"
            }
            else
            {
                $Log+="Install attempted, but printer null`r`n"
            }
        }
        $Log+= "Printer Exists: "+(($Printers.Name).Contains($PrinterCaption)).ToString()+"`r`n"
    }
    catch
    {
        $Log+=$_.ToString()+"`r`n"
    }
    return $Log
}
 
#Installs a driver from an INF file
function Install-Driver
{
    Param
    (
        $DriverName, 
        $DriverPath, 
        $DriverInf
    )
    $Log=""
    try
    {
        $Drivers = @()
        $Drivers += Get-WmiObject -Class "Win32_PrinterDriver"
        if ($Drivers.Length -eq 0 -or -not ($Drivers | Where-Object -FilterScript {$_.Name -like ($DriverName+"*")}))
        {
            $Instance = ([wmiclass]"Win32_PrinterDriver").CreateInstance()
            $Instance.Name = $DriverName
            $Instance.DriverPath = $DriverPath
            $Instance.InfName = $DriverInf
            Invoke-WmiMethod -Class "Win32_PrinterDriver" -Name "AddPrinterDriver" -ArgumentList @($Instance) -Impersonation Impersonate -EnableAllPrivileges | Out-Null
            $Log+= $Instance.ToString()+"`r`n"
        }
        else
        {
            $Log+= ("Driver Exists: "+(($Drivers | Where-Object -FilterScript {$_.Name -like ($DriverName+"*")})).ToString())+"`r`n"
        }
    }
    catch
    {
        $Log+=$_.ToString()+"`r`n"
    }
    return $Log
}
 
#Creates a printer port required to map a printer
function Create-PrinterPort 
{
    Param
    (
        $PrinterIP, 
        $PrinterPort, 
        $PrinterPortName
    )
    $Log=""
    try
    {
        $PrinterPorts = @()
        $PrinterPorts += Get-WmiObject -Class "Win32_TCPIPPrinterPort"
        if ($PrinterPorts.Length -eq 0 -or -not ($PrinterPorts.Name).Contains($PrinterPortName))
        {
            $Instance = Set-WmiInstance -Class "Win32_TCPIPPrinterPort" -Arguments @{Name = $PrinterPortName;HostAddress = $PrinterIP;PortNumber = $PrinterPort;SNMPEnabled = $false;Protocol = 1}
            $Log+=  $Instance.ToString()+"`r`n"
        }
        else
        {
            $Log+= ("Printer Port Exists: "+(($PrinterPorts.Name).Contains($PrinterPortName)).ToString())+"`r`n"
        }
    }
    catch
    {
        $Log+=$_.ToString()+"`r`n"
    }
    return $Log
}
 
function Get-PrinterPort
{
    Param($IP)
    $Log=""
    $ToReturn = @()
    try
    {
        $PrinterPorts = @()
        $PrinterPorts += Get-WmiObject -Class "Win32_TCPIPPrinterPort"
        if ($PrinterPorts.Length -eq 0 -or -not ($PrinterPorts.HostAddress).Contains($IP))
        {
            #$Instance = Set-WmiInstance -Class "Win32_TCPIPPrinterPort" -Arguments @{Name = $PrinterPortName;HostAddress = $PrinterIP;PortNumber = $PrinterPort;SNMPEnabled = $false;Protocol = 1}
            $Log+= "No Printer Port exists matching $IP"
        }
        else
        {
            $ToReturn = $PrinterPorts | Where-Object -FilterScript {$_.HostAddress -eq $IP}
            $Log+= ("Printer Port Exists: "+(($PrinterPorts.Name).Contains($PrinterPortName)).ToString())+"`r`n"
        }
    }
    catch
    {
        $Log+=$_.ToString()+"`r`n"
    }
    return $ToReturn
}
 
#Deletes an already mapped printer
function Delete-Printer
{
    Param($PrinterName, $IP)
    $Log=""
    try
    {
        $Printers = @()
        $Printers += Get-WmiObject -Class "Win32_Printer"
        if ($PrinterName -ne $null)
        {
            $Printers = $Printers | Where-Object -FilterScript {$_.Name -eq $PrinterName}
        }
        elseif ($IP -ne $null)
        {
            $Ports = Get-PrinterPort -IP $IP
            $NewPrinterList = @()
            foreach ($Port in $Ports)
            {
                $NewPrinterList += $Printers | Where-Object -FilterScript {$_.PortName -eq $Port.Name}
            }
            $Printers = $NewPrinterList
        }
        else
        {
            $Log+="No parameters specified to limit removal. No printers removed"
            return $Log
        }
        foreach($Printer in $Printers)
        {
            $Printer.Delete() | Out-Null
            $Log+= $Printer.Name+" deleted`r`n"
        }
    }
    catch
    {
        $Log+=$_.ToString()+"`r`n"
    }
    return $Log
}
 
#Script Entry
if ($Remove)
{
    Write-Host "Removing $PrinterCaption"
    #Remove a printer selected
    $Log+=Delete-Printer -PrinterName $PrinterCaption -IP $PrinterIP
}
elseif($RemoveAll)
{
    #Remove most printers
    $Printers = @()
    $Printers += Get-WmiObject -Class "Win32_Printer" | Where-Object -FilterScript {$Exclusions.Contains($_.Name) -eq $false}
    if ($Printers.Length -gt 0)
    {
        Write-Host ("Attempting to remove "+$Printers.Length+" printers. You may need to run this script once as admin, and once as the user for all printers to be removed.")
        foreach($Printer in $Printers)
        {
            $Log+=(Delete-Printer -PrinterName $Printer.Name)+"`r`n"
        }
    }
    else
    {
        Write-Host "No printers require removal."
    }
}
else
{
    #Install a printer
    if ($DriverOnly -or $AllSteps)
    {
        #Install the printer Driver
        Write-Host "Installing $DriverName"
        $Log+=(Install-Driver -DriverName $DriverName -DriverPath $DriverPath -DriverInf $DriverInf)+"`r`n"
    }
    if (-not $DriverOnly -and -not $PrinterOnly)
    {
        #Output for user visibility
        Write-Host "Mapping printer ($PrinterCaption) from IP $PrinterIP"
        #Add the printer port
        $Log+=(Create-PrinterPort -PrinterIP $PrinterIP -PrinterPort $PrinterPort -PrinterPortName $PrinterPortName)+"`r`n"
        #Finally, create the printer
        $Log+=(Create-Printer -PrinterCaption $PrinterCaption -PrinterPortName $PrinterPortName -DriverName $DriverName -Local $LocalPrinter)+"`r`n"
    }
    if ($PrinterOnly)
    {
        #Output for user visibility
        Write-Host "Mapping printer ($PrinterCaption) from port $PrinterPortName"
 
        $Log+=(Create-Printer -PrinterCaption $PrinterCaption -PrinterPortName $PrinterPortName -DriverName $DriverName -Local $LocalPrinter)+"`r`n"
    }
}
#Write the log to a file
if ($WriteLog)
{
    $Log | Out-file $LogFile
    Write-Verbose $Log
}

Driver Detection

Edit the “lt;DriverName>” Portion of the script below with the name of your driver. Then add the script into SCCM as your script-based detection method for the INF driver installation.

#Note that this script is not perfect, you may need to change the detection method if you have multiple similiarly named drivers.
$DriverName = "" #Replace this with your driver name
$Drivers = Get-WmiObject -Class "Win32_PrinterDriver"
if (($Drivers | Where-Object -FilterScript {$_.Name -like ($DriverName+"*")}))
{
    Write-Host "Driver already installed"
}
exit 0

Printer Detection

Edit the “<PrinterName>” portion of the script below with your own printer name. Then add this to your printer deployment as the script-based detection method.

$PrinterCaption = "" #Change this to your printer name
$Printers = Get-WmiObject -Class "Win32_Printer"
if (($Printers.Name).Contains($PrinterCaption))
{
    Write-Host "Printer already installed"
}
exit 0

Remove-Printer (Interactive Printer Removal Tool)

This must be placed in the same directory as Install-Printer.ps1 This will present a user with a list of printers to exclude. The user can then select a printer by inputting it’s number. If they do, it will be excluded. Once finished, the script will remove all other printers.

<# .SYNOPSIS Interactively assists a user in removing printers .DESCRIPTION Interactively assists a user in removing printers .NOTES Version: 1.0 Author: Matthew Thompson Creation Date: 2017-01-08 Purpose/Change: Updated for Blog #>
 
#Printers to exclude by default
$Exclusions = @("Fax", "Send To OneNote 2013", "Send To OneNote 2010")
 
#Grab a list of printers
$Printers = Get-WmiObject -Class "Win32_Printer" | Where-Object -FilterScript {$Exclusions.Contains($_.Name) -eq $false}
 
#Stores additional exclusions by user
$AdditionalExclusions=@()
 
#Infinite loop (Breaks out with user interaction)
while($true)
{
    Write-Host "Printers to remove:"
    #Print all non excluded printers for user to browse
    $NonExcluded=@()
    $NonExcluded += $Printers | Where-Object -FilterScript {$AdditionalExclusions.Contains($_.Name) -eq $false}
    for($I=0;$I -lt $NonExcluded.Length;$I++)
    {
        Write-Host ($I.ToString()+") "+$NonExcluded[$I].Name)
    }
    #Ask user to exlude another printer or continue
    $UInput = Read-Host -Prompt "Please select a printer to exclude or type `"f`" to finish"
    if ($UInput.ToLower() -eq "f")
    {
        #On continue, break out of infinite loop
        break;
    }
    #Otherwise matching selected index to printer, and add.
    $UIndex=$null
    if ([int]::TryParse($UInput, [ref]$UIndex) -and $UIndex -ge 0 -and $UIndex -lt $NonExcluded.Length)
    {
        $AdditionalExclusions+=$NonExcluded[$UIndex].Name
    }
    else
    {
        #In case someone can't type a number
        Write-Host "Input could not be parsed, please try again"
    }
}
#Call the parent script with the selected exclusions
Write-Host "Removing printers"
&".\Install-Printer.ps1" -RemoveAll -AdditionalRemovalExclusions $AdditionalExclusions -WriteLog

HashCompare

Code Release

HashCompare compares a file with a known MD5 hash and returns the output in an SCCM compatible manner. To understand more about why this script exits as it does, you should read “To use a custom script to determine the presence of a deployment type” (Under step 4) on technet.

Usage

Configuration

The script is fairly simple. You only need to configure the top 2 lines. First set $FilePath to the location of the pre-existing file. Then set $ExpectedHash to the MD5 hash of the deployed file. You can get the MD5 hash from powershell using Get-Hash in Powershell 4.0 or, if you are not up to 4.0, by using this Get-Hash.

General Usage

Inside of a powershell console enter the following:

&""

Example:

&"C:\Scripts\HashDetect.ps1"

SCCM Usage

After configuration, import the script as a new Detection Method for your deployment.

Script


$FilePath = "C:\ProgramData\MyApp\MySettings.xml"
$ExpectedHash = "00-00-00-00-00-00-00-00-00-00-00-00-00-00-00-00"

if (-not (Test-Path $FilePath))
{
    #File path not found. Not installed.
    exit 0
}

try
{
    $FileStream = New-Object IO.FileStream $FilePath, "Open"
    $MD5 = new-object -TypeName System.Security.Cryptography.MD5CryptoServiceProvider
    $Hash = [System.BitConverter]::ToString($MD5.ComputeHash($FileStream))
}
catch
{
    Write-Error $_.ToString()
    exit 1
}

#Compare the hash with a known hash
if ($Hash -eq $ExpectedHash)
{
    Write-Output "Hash match. File already installed."
    exit 0
}
else
{
    #Hash MisMatch. Not installed
    exit 0
}

Installing Java through SCCM

This post was migrated from my older blog.

I have been trying to get Java to install smoothly from SCCM for quite a while now. We need to deploy Java in a way that ensures that old versions of Java are removed, and both 32-bit and 64-bit versions of Java are installed. Here is a list of problems a ran into, as well as fixes for each.

The GUID is only Semi-Predictable

Uninstalling Java improves security as the Java installer frequently fails to remove previous versions. So, how do we uninstall Java remotely through SCCM? The most obvious approach is to remove Java by the GUID with MSIEXEC. Example:

MsiExec.exe /X{26A24AE4-039D-4CA4-87B4-2F06417067FF} /qn /norestart

This works well, but you have to know the GUIDs beforehand. If you search for the Java GUIDs you will likely find forums with comments stating to just replace parts of the GUID with the software version and bit version. We had a script that, mostly, worked based on this concept.

Here is the general suggestion you will find when you search for the Java GUIDs. The first bolded part of the following GUID is the bit version of Java, 32 or 64. The second bolded part relates to the specific version of Java. In this case, 7 update 55.

{26A24AE4-039D-4CA4-87B4-2F83217055FF}

This does not work all the time however.

Here’s an example:

Java 7 Update 55 {26A24AE4-039D-4CA4-87B4-2F83217055FF}
Java 7 Update 60 {26A24AE4-039D-4CA4-87B4-2F03217060FF}

The bolded parts changed outside the expected pattern.

That’s just one example, it seems as though subtle changes like that are littered through the Java releases. Most scripts that remove multiple versions of Java don’t seem to account for this. Our in-house script didn’t.

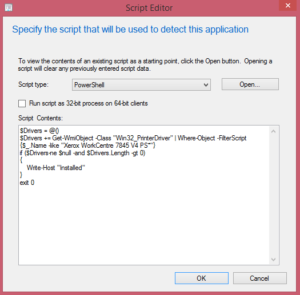
I noticed that the parts of the GUID that frequently change are only on the last segment of the GUID. The front segments of the GUID rarely change. I built a powershell script to remove Java on this concept.

Click here to go to the wiki page on the JavaRemoval script.

SCCM starts 32-bit Powershell by default

The removal works well by itself, but had issues when used in an SCCM package. It only removed 32-bit versions of Java. This leads to multiple 64-bit versions of Java. Thanks to the logging lines I added to the script I found out that it was only receiving the 32-bit keys, even from the 64-bit registry path. Turns out, SCCM executes the script with the 32-bit Powershell. This was a quick fix thanks to this technet post. I took jfvanroy’s answer and entered in the Powershell script name. It is working well so far. You can find a copy of it below.

If "%PROCESSOR_ARCHITEW6432%"=="" GOTO Native
%windir%\Sysnative\windowsPowershell\V1.0\PowerShell.exe -NoProfile -ExecutionPolicy Bypass -file %~dp0JavaRemoval.ps1
GOTO END
:Native
PowerShell.exe -NoProfile -ExecutionPolicy Bypass -file %~dp0JavaRemoval.ps1
:END

The Uninstall Restart

The next problem I ran into with uninstalling/installing Java is a reboot requirement. Our original batch file uninstalled and installed Java in one run. This was hit or miss for 2 reasons. The first script that we made did not have a /norestart switch to the uninstall command. When a restart was required, the machine rebooted. The problem with that is it cancels the rest of the script which prevents Java from being installed. SCCM does not resume scripts that restart in the middle of their execution. As for the second reason; when we added the /norestart switch the install fails due to a pending restart. One of the main reasons a reboot was required is because IE or Java was still in use by a user at the deployment deadline.

We originally remedied these issues by using a task-sequence with a required reboot in-between an uninstall and install step. We added a few taskkill commands to our script to help with the program in-use issues. Not exactly elegant, but it worked… mostly. This was before we figured out the GUID issues. We are now using a single application package for uninstall and 2 application packages for install. This is done to bridge any gaps created by the install. For example, if you uninstall Java, then install the latest version, this causes a gap in the Java coverage for the user. To fix this, deploy two packages, x86 and x64, of Java. Then about a week later, deploy an uninstall package the removes all versions except for the version you want to standardize your users on.

The Installer doesn’t work with the 64-bit System Account

When you use the executable installer to install Java, it extracts an MSI and CAB file to the AppData folder. It then runs a MSIEXEC /i command to install the extracted MSI file. For home users this usually works, as it uses the home user’s account. SCCM, however, uses the system account. The system account is a little odd in that, it has two profiles. A 32-bit and a 64-bit profile. MSIEXEC is a 64-bit utility in 64-bit versions of windows, but the Java installer runs as 32-bit. The files that the installer extracts ends up in the 32-bit system profile. When MSIEXEC goes to install the MSI, it looks in the 64-bit profile and fails to find it.

This is a known bug and has been for a while. Shavlik submitted a bug report to Java back in 2010 on the issue, however it was recently resolved with the resolution “Won’t Fix”.

A workaround to this, is to extract the MSI, and CAB file for older versions, and run those directly. It works but it is an unsupported practice according to Oracle. Update: You were once able to find instructions on how to do that at Oracle’s website. This page now advertises their enterprise “My Oracle Support” option. As such, I will include the instructions below.

  1. Download the Java SE JRE Offline installers from the Java SE Downloads page
  2. Run the installers but do not click next or continue the installation!
  3. Once the installer is visible, navigate to “C:\Users\[Your UserName]\AppData\LocalLow\Oracle\Java” or “%APPDATA%\..\LocaLow\Oracle\Java”. Inside this directory you should see a folder matching the version of Java you started the installer for. For example “jre1.8.0_112_x64”. Copy everything inside the folder to wherever you need the install files to be. Pre Java 8 Update 20, this folder usually contained an MSI and CAB file. Afterwards, it is usually just a single MSI file. Either way, that MSI file and any supporting files in that folder make up the extracted installer. Repeat this as needed for the 32/64 bit versions if you are installing those as well.

Java extracts two files (Pre 8 Update 20)

I briefly attempted to deploy Java through SCUP. I sent a test deployment out and it half worked. Some received the update, some didn’t. Mostly it was just a mess. At the time I was not fully sure why, but it is likely that it was due to the same issue I had deploying Java as an application package. It extracted to the wrong system profile

Before entirely giving up on the idea, I decided to see if I could send it out using the extracted MSI files. It was not even plausible as a concept as Java extracts to 2 files, a MSI and a CAB. Both files are required for the install to succeed. SCUP does not support multi-file installers unfortunately.

Update 2016-01-07: The 2 file issue appears to have stopped. Extracting Java now only seems to produce a single MSI file. I have not attempted a SCUP deployment however. If it does work, the next problem will still be an issue.

Java doesn’t remove old versions in silent mode

Java recently, starting with an update of 8, started to prompt during install to remove previous version of Java. This does works well for home users, but for enterprise environments, this does not work in silent mode. There are currently no switches you can use to get the MSI to remove old versions.

Java doesn’t install in silent mode correctly without a config file

Another recent development with Java, is that it now appears to require a config file in order to install in silent mode correctly. The /q switch for msiexec is no longer enough.

The config file needs to be saved to “C:\ProgramData\Oracle\Java\java.settings.cfg”. The file is a plain text file with install commands on every line. The line we need to ensure a functional silent install is “INSTALL_SILENT=1”. See below for an example config file.

AUTO_UPDATE=0
EULA=0
INSTALL_SILENT=1
SPONSORS=0
WEB_ANALYTICS=0

There is a sub issue related to this. If you leave the config file in place after the install occurs, then any administrator that then needs to manually update or remove Java in the future will not see their installer/uninstaller run. More than likely, they will troubleshoot their “failing” installer until they finally realize that the installer actually is running, but is forced into silent mode by the left over file.

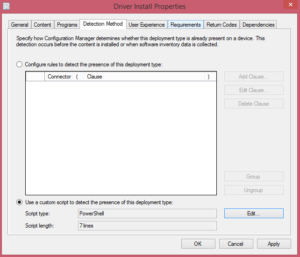
My Complete Solution

I have a 3 Deployment solution that appears to work solidly in SCCM. Instructions on how to create the solution is located at Java_Install_Package

In general though, the package can be built as such:

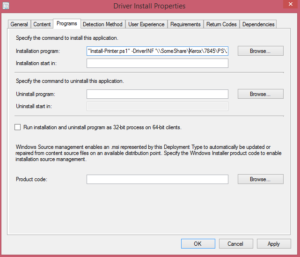
  1. Create an application package. Ensure the source folder contains the extracted installers for whatever version of Java you are installing.
  2. Add to the source folder a silent install config file, and a batch file that installs the config file, installs java, then removes the config file.
  3. Repeat for any other versions of Java.
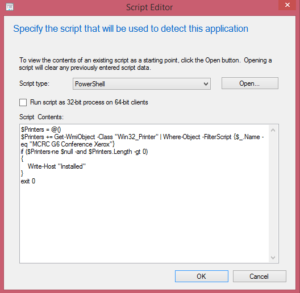
  4. Use the JavaRemoval script and the batch code from Problem 2 to create a Java Removal package that removes all versions of Java except the ones that you just built packages for.
  5. Deploy the 2 installers for x86 and x64 in SCCM.
  6. Deploy the uninstaller about a week later when 95% or more of your clients have your new version of Java.

The end effect of all this is, when the install program is deployed it will install Java. The uninstall package which should be deployed a week later will uninstall un-needed versions of Java.